


Introduction:
Managing an AWS account can be challenging, especially as it grows with time. Unused resources can accumulate, causing unnecessary costs and potential security risks. But fear not! AWS Nuke is here to save the day. In this blog, we will explore what AWS Nuke is, why it's essential, how to install it, create a configuration file, check the resources to be deleted, and ultimately, unleash the power of AWS Nuke to clean up your AWS account. Let's dive in!
Note for the Audience:
Throughout this blog, we will be demonstrating the installation and usage of AWS Nuke using a Windows laptop. The commands and steps mentioned in the blog may vary slightly for users on other operating systems such as Linux or macOS. However, the overall concepts and functionality of AWS Nuke remain the same regardless of the operating system. If you are using a different operating system, please refer to the official AWS Nuke documentation for specific instructions related to your platform.
What is AWS Nuke?

AWS Nuke is a cool tool that helps you get rid of stuff you don't need in your AWS account.
It's like a cleanup crew that removes things like old servers, unused storage, and other stuff that's just taking up space and costing you money.
Why do we need AWS Nuke?
As time goes on, your AWS account can get cluttered with things you're not using anymore.
These things still cost money and can even be a security risk if they're not properly managed.
AWS Nuke makes it easy to find and delete these things, so you can save money and keep your account organized.
3. How to Install AWS Nuke:
AWS Nuke can be installed on various operating systems, including Windows, Linux, and macOS (iOS).
Here's how you can install it on different platforms:
Windows:
- Download the Windows version of AWS Nuke from the link given below:
https://github.com/rebuy-de/aws-nuke/releases/download/v2.22.1/aws-nuke-v2.22.1-windows-amd64.zip
Once the download is complete, locate the downloaded executable file (.exe) on your computer.
Open the Command Prompt by pressing the Windows key + R, typing "cmd," and pressing Enter. (Run your Command Prompt as an Administrator)
In the Command Prompt, navigate to the directory where the AWS Nuke executable file is located.
First enter the current directory where you have stored the file by typing: “cd c:\aws-nuke”
And then enter “aws-nuke-v2.22.1-windows-amd64.exe version” to check the actual version of the aws nuke

Run the AWS Nuke executable by entering its name followed by the appropriate command-line arguments.
After this, you have to configure a file that is written below to execute aws nuke commands to delete everything.
Linux:
Open a terminal on your Linux system.
Install AWS Nuke using a package manager like apt or yum, depending on your Linux distribution. For example, on Ubuntu, you can use the following command:

- Once the installation is complete, you can run AWS Nuke from the terminal using the aws-nuke command.
macOS (iOS):
Open the Terminal application on your macOS system.
Install AWS Nuke using a package manager like Homebrew.

- After the installation is finished, you can run AWS Nuke from the terminal using the aws-nuke command.
Note: The installation process may vary depending on the version and package manager of your operating system. Make sure to refer to the official AWS Nuke documentation for specific instructions related to your platform.
Once AWS Nuke is installed, you're ready to proceed with configuring and using it to clean up your AWS resources.
Also, Every operating system allows different versions of aws-nuke commands to execute the actions.
For Windows, it will always be: aws-nuke-v2.22.1-windows-amd64.exe
And for Linux and iOS: aws-nuke
4. Creating a configuration file:
AWS Nuke needs a special file to know what things to delete.
This file is written in a way that's easy for computers to understand, but it might look a bit weird to us humans.
You can create this file by typing it out manually or using an example file that comes with AWS Nuke.
Create a nuke-config.yml file such as:

What does the aws-nuke config file consist of:
First - select the region in which you have created the aws resources.
Second - in the account section add your actual AWS Account ID.
Third - in the targets, you can customize them regarding your need (for example - add “S3 Buckets” to delete all the infrastructure in AWS.
5. Checking the resources to be deleted:
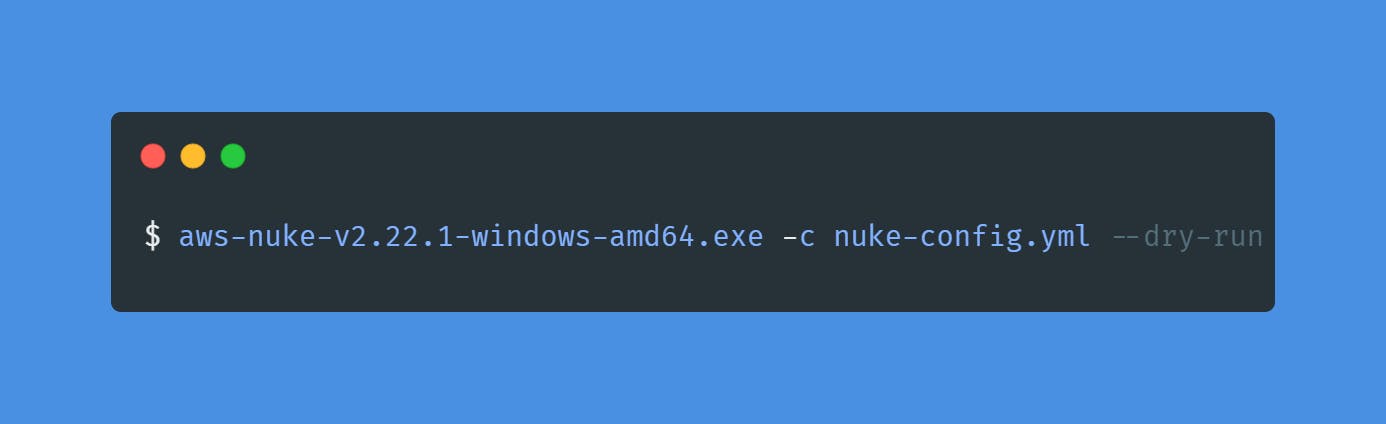
Before deleting anything, it's important to double-check what AWS Nuke is planning to delete.
You can do this by running AWS Nuke in a safe mode that only pretends to delete things. It's like a practice run.
AWS Nuke will show you a list of things it would delete, so you can make sure it's not deleting anything important.
Destroying everything:
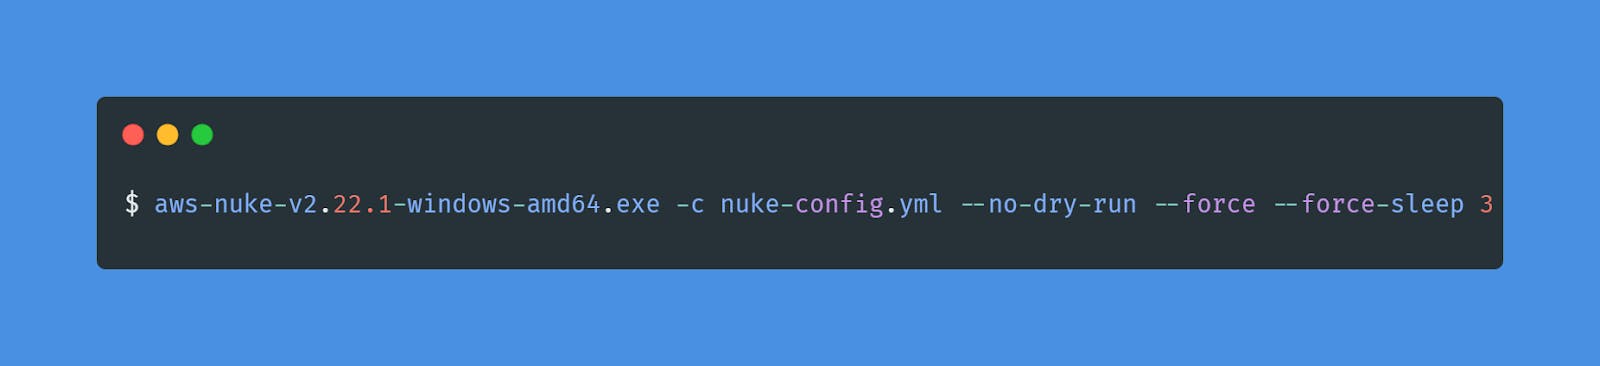
Once you're confident with what AWS Nuke will delete, you can let it do its thing for real.
Just run AWS Nuke without the pretend mode, and it will start deleting the things you don't need.
It's important to be careful and make sure you have backups of anything important before letting AWS Nuke loose.
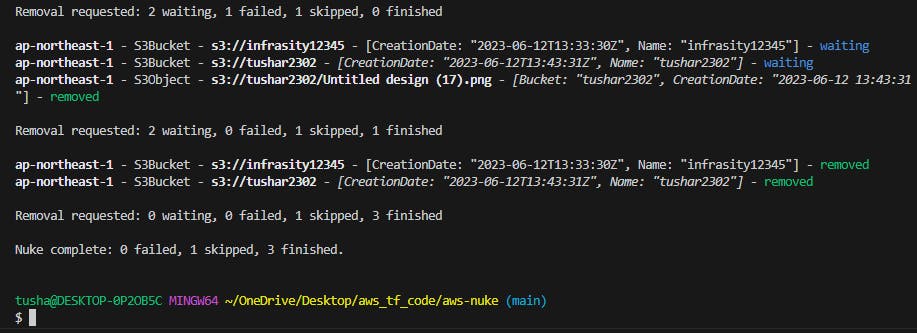
During the execution of the AWS Nuke command, the tool scans the specified AWS account for resources to delete. It provides a summary of the resources it found, including S3 buckets and objects. In this example, the S3 buckets named "infrasity12345" and "tushar2302" were successfully removed. The S3 object "Untitled design (17).png" within the "tushar2302" bucket was also removed. However, one S3 object removal failed. The process concludes with a report showing the number of failed, skipped, and finished removals
Terraform destroy vs. AWS Nuke:
Sometimes people use a tool called Terraform to create things in AWS.
When you want to get rid of things made by Terraform, you use a command called "Terraform destroy."
But AWS Nuke is different because it can delete everything, even things that Terraform didn't create.
So, you can use Terraform destroy for the things made by Terraform and AWS Nuke to clean up everything else.
By using AWS Nuke, you can easily keep your AWS account clean, save money, and make sure you're only paying for what you actually need. Just be careful and review what AWS Nuke is planning to delete before letting it do its job!
Conclusion:
AWS Nuke is a powerful tool for keeping your AWS account clean and optimized. By removing unused and unnecessary resources, you can save costs, improve security, and maintain a well-organized account. We covered the installation process, configuration file creation, resource check, and the process of destroying everything you no longer need. Remember to exercise caution and verify the resources AWS Nuke plans to delete before executing the final deletion. With AWS Nuke in your arsenal, you can confidently manage your AWS account, ensuring it remains efficient and cost-effective. So, give AWS Nuke a try, and enjoy the benefits of a cleaner AWS environment!