


What is S3 , types, and what is the use?
Here's a beginner-friendly documentation explaining what AWS S3 is, its types, and its uses:
Introduction to AWS S3
AWS S3, which stands for Amazon Simple Storage Service, is a highly scalable and durable cloud storage service provided by Amazon Web Services (AWS). It is designed to store and retrieve large amounts of data and is widely used by individuals, businesses, and organizations of all sizes.
Types of AWS S3 Buckets
Standard S3 Buckets: Standard S3 buckets offer high durability, availability, and performance. They store data across multiple devices and facilities within a region, providing excellent reliability.
Intelligent-Tiering Buckets: Intelligent-Tiering buckets automatically optimize storage costs by moving data between two access tiers: frequent access and infrequent access. It ensures that frequently accessed data remains in the frequent access tier for quick retrieval while moving less accessed data to the infrequent access tier for cost savings.
Glacier Storage Class Buckets: Glacier storage class is designed for long-term archival of data. It provides very low-cost storage but with longer retrieval times (ranging from minutes to hours). It is suitable for data that is rarely accessed but needs to be retained for compliance or regulatory requirements.
Glacier Deep Archive Buckets: Glacier Deep Archive is the most cost-effective storage class within S3. It is optimized for long-term retention of data that is accessed less than once or twice a year. Retrieval times can take several hours, but it offers the lowest storage cost.
S3 Standard-Infrequent Access (S3 Standard-IA): This storage class is designed for infrequently accessed data that needs to be quickly retrievable when needed. It has lower storage costs than the Standard bucket, but has higher retrieval costs.
S3 One Zone-Infrequent Access (S3 One Zone-IA): This is similar to the Standard-IA storage class, but stores data in a single availability zone instead of multiple zones, making it less durable.
Use Cases of AWS S3
Backup and Restore: S3 is commonly used as a backup solution for various types of data, such as databases, files, and server configurations. Its durability and availability ensure that data remains safe and can be restored whenever needed.
Static Website Hosting: S3 can host static websites by storing HTML, CSS, JavaScript, and other web content. It provides a reliable and scalable platform for hosting websites with high availability and low latency.
Data Archiving and Compliance: S3's cost-effective storage classes, such as Glacier, make it an ideal choice for long-term data archiving and compliance purposes. It helps organizations meet regulatory requirements by securely storing data for extended periods.
Content Distribution: S3 integrates seamlessly with AWS CloudFront, a content delivery network (CDN), to distribute static and dynamic content globally. This combination enables fast and reliable content delivery to end-users, reducing latency and enhancing user experience.
Data Lakes and Analytics: S3 serves as a foundation for building data lakes, which are centralized repositories that store structured and unstructured data. By leveraging S3, organizations can perform big data analytics, run machine learning algorithms, and gain valuable insights from their data.
Media Storage and Distribution: S3 is commonly used for storing media files, such as images, videos, and audio files. It provides scalable and secure storage for media assets, which can be accessed and delivered efficiently to end-users or integrated into applications.
These are just a few examples of how AWS S3 can be utilized. Its versatility and wide range of features make it suitable for various storage and data management needs across different industries and applications.
With this understanding, you can start exploring AWS S3 and leverage its capabilities to store, manage, and secure your data effectively.
How to create a s3 bucket via UI
Here's a beginner-friendly documentation on how to create an AWS S3 bucket using the AWS Management Console UI:
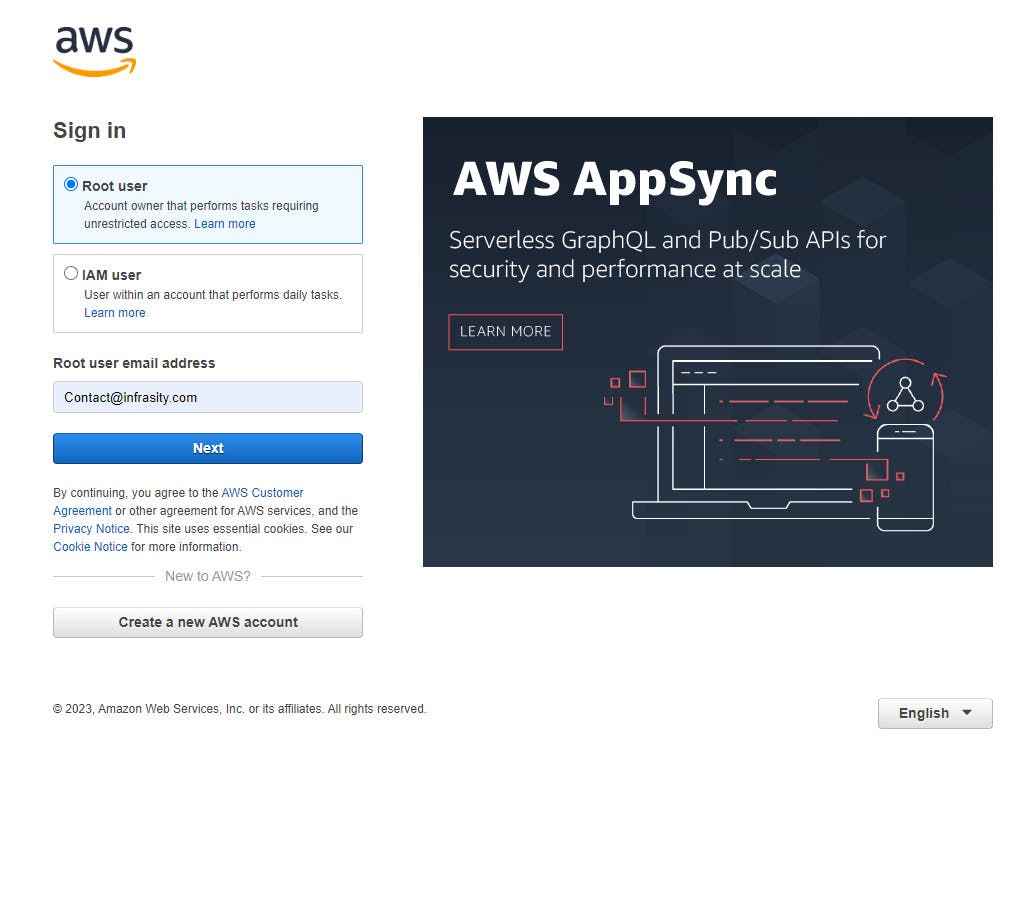
Step 1: Sign in to the AWS Management Console
Open your web browser and go to the AWS Management Console (https://console.aws.amazon.com/).
Sign in to your AWS account using your credentials.
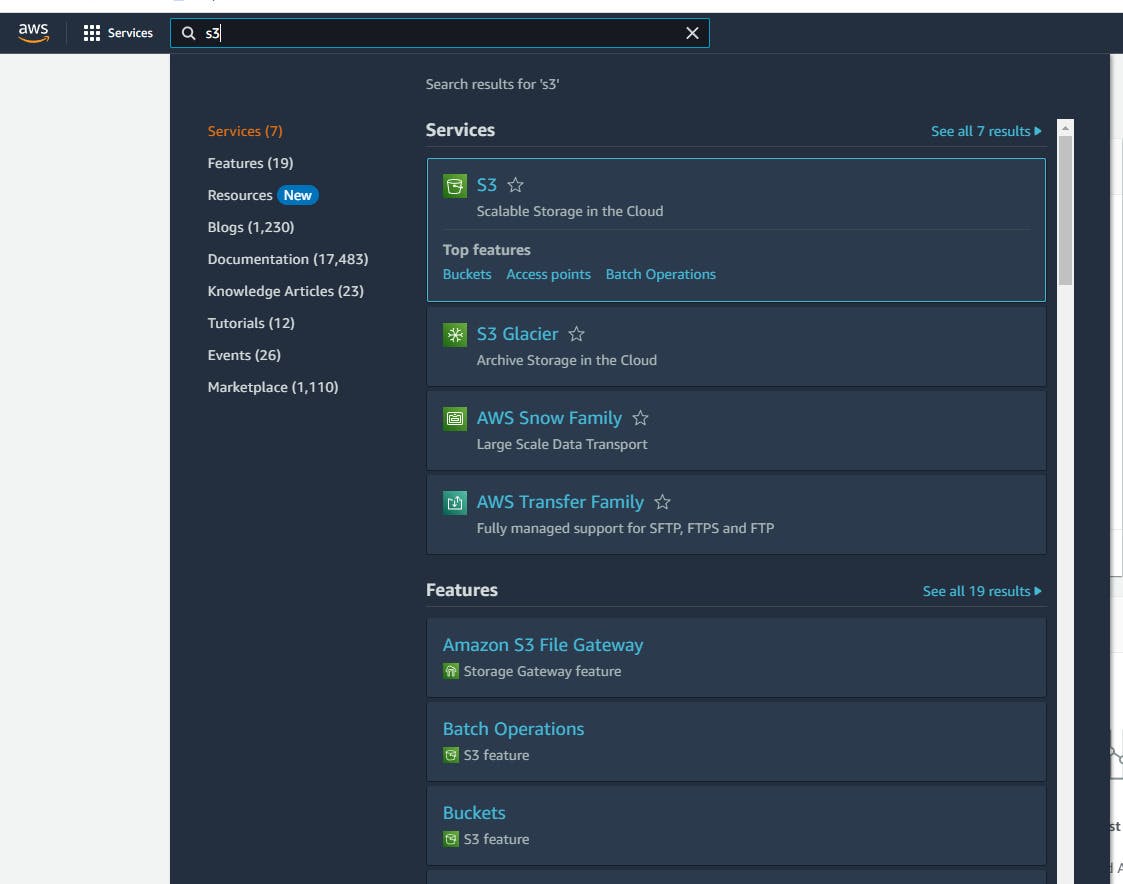
Step 2: Navigate to the S3 service
Once you are signed in, you will see a search bar at the top of the AWS Management Console.
Type "S3" in the search bar, and click on the "S3" service under "Storage".
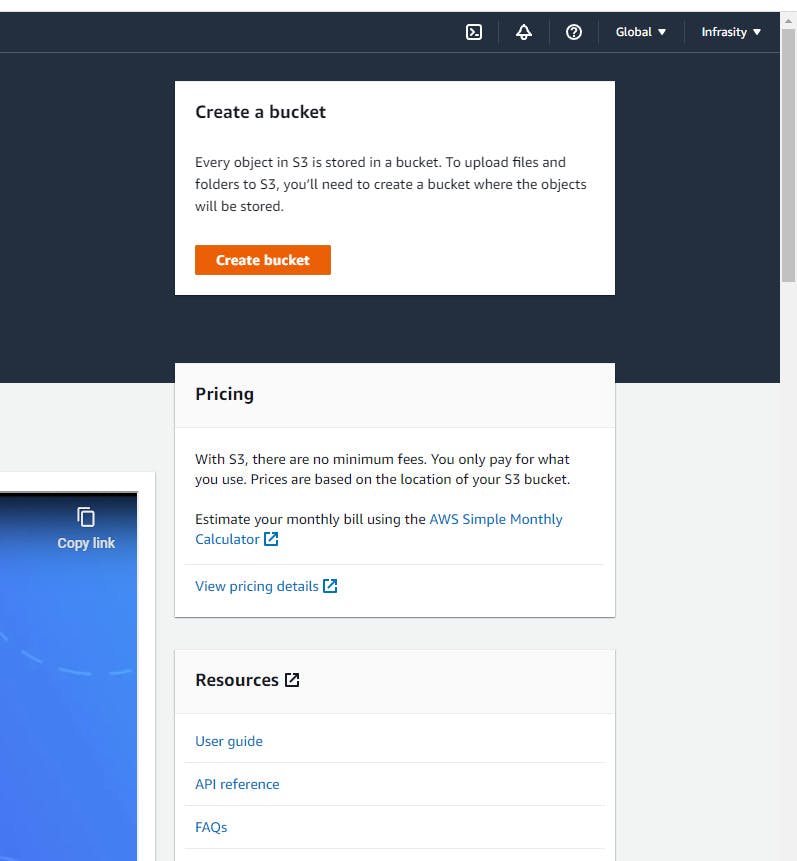
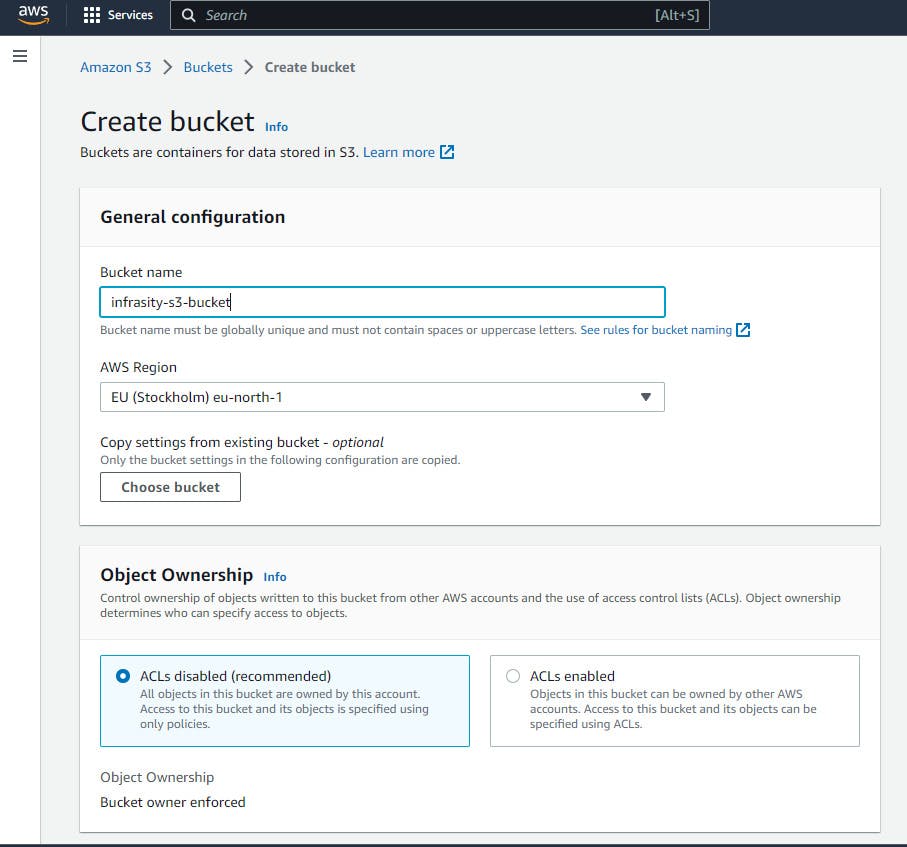
Step 3: Create a new S3 bucket
- On the Amazon S3 dashboard, click on the "Create bucket" button to start the bucket creation process.
Step 4: Configure bucket settings
In the "Bucket name" field, enter a unique name for your bucket. Bucket names must be globally unique across all existing AWS customers.
Select the AWS Region where you want to create your bucket. Choose the region closest to your target audience or your other AWS resources for better performance.
Leave the "Block all public access" option enabled to ensure that your bucket is not publicly accessible by default. This helps prevent accidental exposure of your data.
Click on the "Next" button to proceed.
Step 5: Configure bucket properties (optional)
On this page, you can configure additional properties for your bucket if needed. For beginners, it's recommended to leave the default settings as they are.
Click on the "Next" button to proceed.
Step 6: Set permissions
In the "Set permissions" step, you can specify who can access your bucket and the objects within it. For beginners, it's recommended to leave the default settings as they are.
Click on the "Next" button to proceed.
Step 7: Review and create the bucket
Review all the settings you have configured for your bucket.
If everything looks good, click on the "Create bucket" button to create your S3 bucket.
Step 8: Bucket creation confirmation
- Once the bucket is created, you will see a confirmation message along with your newly created bucket listed on the S3 dashboard.
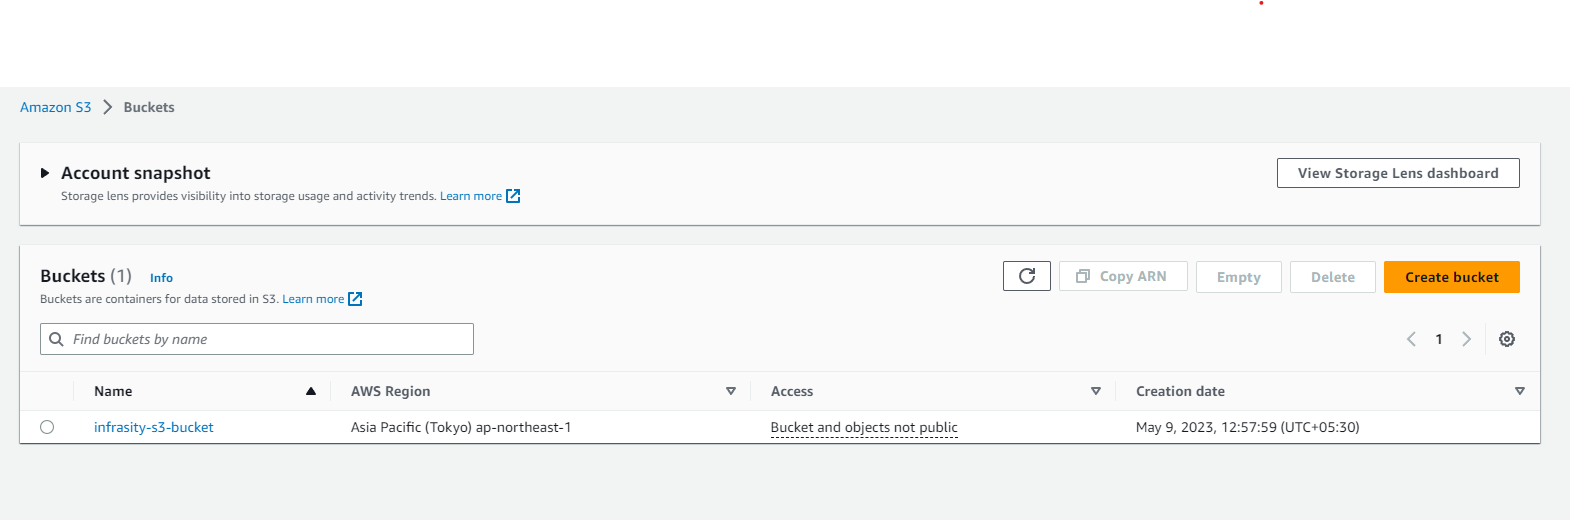
Congratulations! You have successfully created an S3 bucket using the AWS Management Console UI. You can now start using your bucket to store and manage your files and objects. Remember to manage your bucket's access permissions and security settings according to your requirements.
Important point to note :
When creating an S3 bucket with versioning, there are several important factors to consider to ensure that your data is properly managed and secured. Here are some of the things to keep in mind:
1. Versioning configuration: When creating an S3 bucket with versioning, you need to configure the versioning settings to determine how versions are stored and accessed. You can choose to enable or disable versioning, configure versioning lifecycle policies, and set permissions for accessing different versions of your objects.
2. Storage costs: Enabling versioning for your S3 bucket can increase your storage costs, as each version of an object is stored separately. You should consider the cost implications of versioning and ensure that it aligns with your budget and data storage needs.
3. Backup and recovery: Versioning can provide additional backup and recovery capabilities for your data. However, you should ensure that you have proper backup and recovery processes in place to ensure that you can restore your data in case of accidental deletion or data corruption.
4. Access control: When using versioning in S3, you need to ensure that you have proper access controls in place to prevent unauthorized access to your data. You can use S3 bucket policies, access control lists (ACLs), and other security mechanisms to manage access to your versions.
5. Retrieval and deletion: When accessing or deleting versions in S3, you need to consider the different retrieval and deletion options available, as these can affect your storage costs and data availability. You can choose to retrieve or delete specific versions of your objects, or use lifecycle policies to automate the process.
By considering these factors when creating an S3 bucket with versioning, you can ensure that your data is properly managed and secured, and that you can easily access and recover your data in case of any issues.
How to create s3 bucket via terraform
Here's a beginner-friendly step-by-step guide on how to create an Amazon S3 bucket using Terraform:
Install Terraform: Start by installing Terraform on your local machine. You can download the latest version from the official website: https://www.terraform.io/downloads.html. Follow the installation instructions specific to your operating system.
Set up AWS credentials: To interact with AWS services using Terraform, you need to set up your AWS credentials. You can create an access key and secret key by following the instructions in the AWS documentation: https://docs.aws.amazon.com/general/latest/gr/aws-sec-cred-types.html#access-keys-and-secret-access-keys.
Initialize a new Terraform project: Create a new directory for your Terraform project and navigate to it in your terminal or command prompt. Run the following command to initialize the project:
"terraform init"
This command will download the necessary provider plugins and set up your working directory.
- Create a Terraform configuration file: In the project directory, create a new file with a .tf extension, such as main.tf. Open the file in a text editor and add the following code:
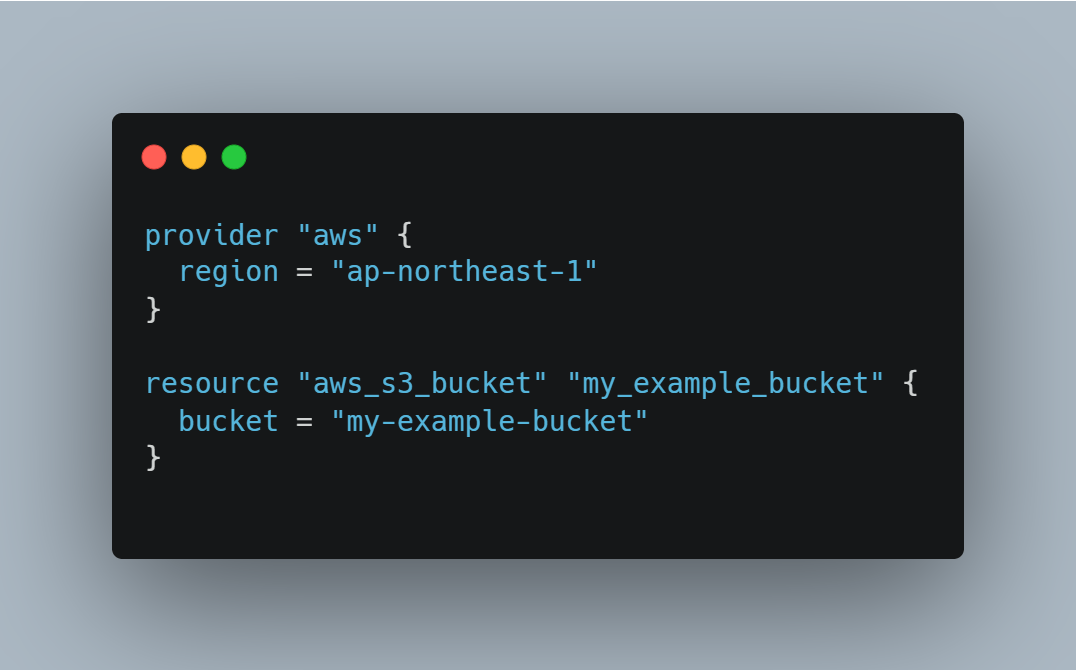
provider "aws" { region = "ap-northeast-1" } resource "aws_s3_bucket" "my_example_bucket" { bucket = "my-example-bucket" }
In this code, we specify the AWS provider and set the region to ap-northeast-1. We then define an aws_s3_bucket resource with the desired bucket name.
Plan the Terraform changes: Run the following command to see the execution plan and verify what Terraform will create:
"terraform plan"
Terraform will analyze the configuration and show you a summary of the changes it intends to make.
Apply the Terraform changes: If the plan looks correct, you can apply the changes by running the following command:
"terraform apply"
Terraform will prompt you to confirm the changes. Type yes and press Enter to proceed.
- Verify the S3 bucket creation: Once the apply command completes, Terraform will create the S3 bucket. You can log in to the AWS Management Console, navigate to the S3 service, and verify that the bucket with the specified name ('my-example-bucket') exists in the 'ap-northeast-1' region.
That's it! You have successfully created an Amazon S3 bucket using Terraform. You can further enhance your Terraform configuration by adding additional properties or customizations as per your requirements. Remember to manage your Terraform state files and version them appropriately to track changes and collaborate with other team members.
For more detailed information and additional configuration options, you can refer to the official Terraform AWS provider documentation: https://registry.terraform.io/providers/hashicorp/aws/latest/docs/resources/s3_bucket
Want to learn this through a video?
Checkout this: youtube.com/watch?v=U9wmX10nAi0