

Creating IAM Groups, Custom Users, Admin Users, and Assigning Policies: A Step-by-Step Guide


Introduction:
In this blog post, we will explore the real business case study where an organization let’s say XYZ.com wants to deliver training to their new trainees, however, they would like to make sure that full access is not granted to these new trainees as they are new to AWS and then might end up spinning resources which are not required hence there is a need to make sure a mechanism to restrict these users to certain policies.
Why do we do this?
We do this to reduce our cost of unnecessary infrastructure by restricting the access of users to create certain resources, to attain granular control over account access.
How do we do this?
We do this simply by dividing the access of the AWS into three levels which are “Root User”, “Admin User”, and “Custom User (Trainee)”.
Note: We don’t create Root User as it is created by AWS only at the time of creating an AWS account.
The level of their access is determined by the permission they have which in simple language means:
The root user is like the owner of the house, with ultimate control and power.
The admin user is like a helper with more control and responsibilities but not as much power as the owner.
The custom users come under admin users who have specific permissions and limitations based on what they are allowed to do in the house.
We will complete this case study with the help of Terraform because through it we can automate our scale of users at a very large scale in a very less time.
By following this step-by-step guide, you will be able to set up a secure and organized access control system for your AWS infrastructure.
Also before diving in here is a visual representation of the workflow which we are going to follow:
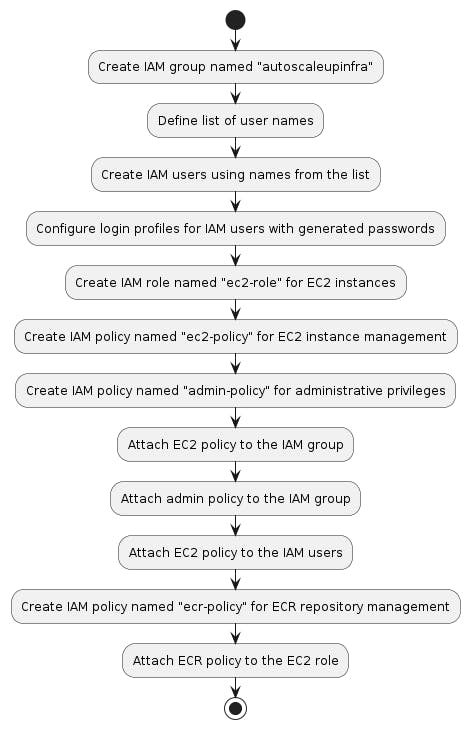
Now let’s dive in:
Step 1: Creating an IAM Group
To start, we will create an IAM group that will serve as a container to organize our users and assign policies collectively. The group name can be customized based on your requirements, such as "training_group" or any other preferred name. Here's the code snippet to create the IAM group:
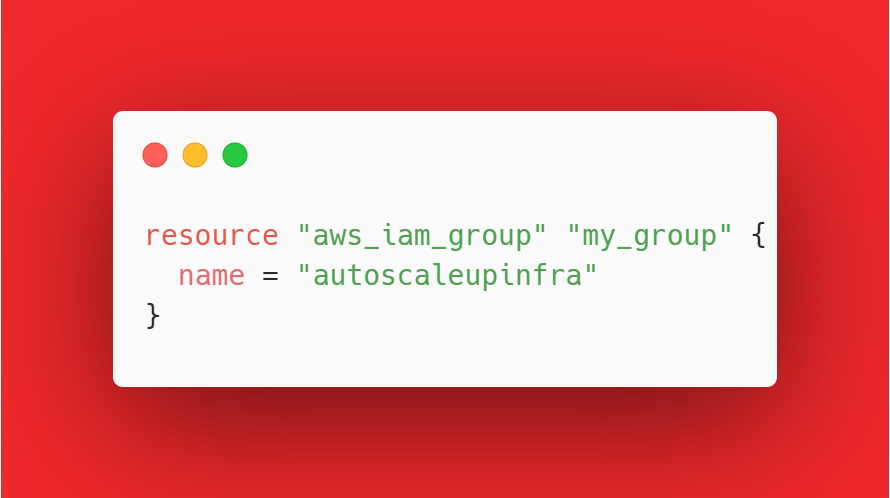
Here I am using the name "autoscaleupinfra".
Step 2: Defining Custom User Names
Next, we define a list of custom user names. These can be individuals or roles that you want to grant access to your AWS resources. For example, you can use employee names in the format "firstname@domain.com", where "first name" represents the first name of the employee and "domain.com" represents the domain name of the company. Update the list according to your requirements, including the names of your employees or roles.

Step 3: Creating IAM Users
Using the user names defined in the previous step, we will create IAM users. Each user will have their login profile and generated password. Here's the code to create the IAM users:

Step 4: Creating Admin IAM Users
Similar to custom users, we will create admin users. These users will have elevated privileges to perform administrative tasks. Here's the code to create admin IAM users:

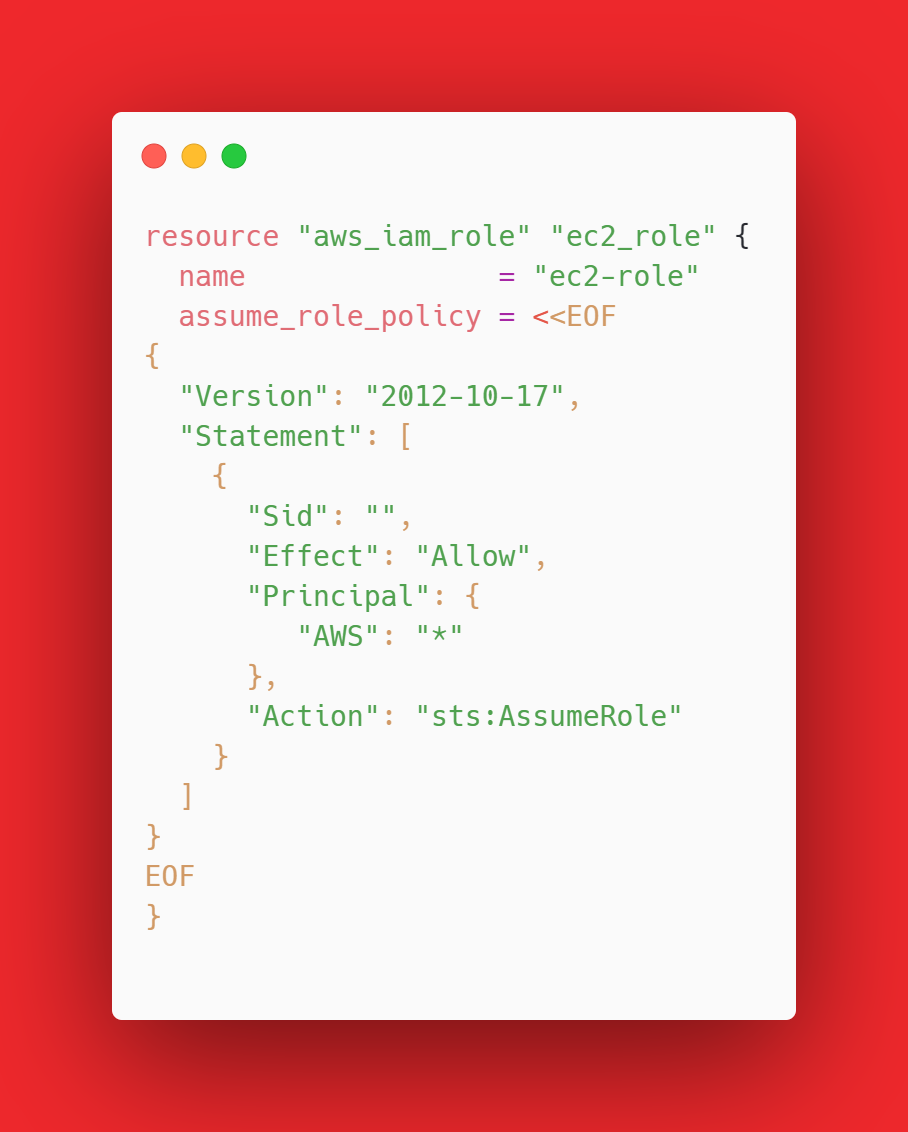
Step 5: Creating an IAM Role for EC2 Instances
Now, we will create an IAM role named "ec2-role" specifically for EC2 instances. The role is an important component in the overall workflow as it defines the permissions and policies for EC2-related actions.
In AWS, roles are used to grant permissions to entities, such as EC2 instances, Lambda functions, or other AWS services, to access AWS resources. By assigning a role to an entity, you can control what actions it can perform and what resources it can access.
In the context of our workflow, the "ec2-role" will be attached to EC2 instances. This allows the instances to assume the role and inherit the permissions and policies associated with it. By assigning specific permissions to the role, you can control the actions that the EC2 instances can perform on AWS resources.
For example, you can define policies within the role that allow the instances to create, start, stop, or terminate EC2 instances, manage security groups, and access other AWS services as needed. This helps enforce security and restricts the actions that the instances can take, ensuring they adhere to the defined permissions.
In summary, the IAM role "ec2-role" plays a crucial role in granting permissions and policies to EC2 instances, allowing them to interact with AWS resources securely and within the desired scope.
Step 6: Creating IAM Policies
IAM policies define the permissions and restrictions for various actions. We will create two policies: "ec2-policy" for EC2 instance management and "admin-policy" for administrative privileges. Here's the code to create these policies:

Step 7: Attaching Policies to the IAM Group and Users
To ensure that the IAM group and users inherit the desired policies, we will attach the policies to them. Use the following code:

Step 8: Creating an IAM Policy for ECR Repository Management
Lastly, let's create an IAM policy named "ecr-policy" that allows managing ECR repositories. Use the code below:

Step 9: Running the Terraform Code
To execute the Terraform code and create the IAM resources, follow these steps:
Open a terminal or command prompt on your local machine.
Navigate to the directory where you saved the Terraform configuration file (e.g., iam-setup. tf).
Initialize the Terraform working directory by running the following command:
This command downloads the necessary provider plugins and sets up the working directory.
Validate the Terraform configuration by running the following command:

This command checks the syntax and structure of the Terraform code for any errors.
Preview the changes that Terraform will make by running the following command:

This command shows a summary of the resources that will be created, modified, or deleted.
If the plan looks correct, apply the changes by running the following command:
You will be prompted to confirm the execution of the plan. Type "yes" and press Enter to proceed.
Terraform will start creating the IAM groups, custom users, admin users, policies, and roles based on the provided configuration. The output will display the progress and any errors or warnings encountered during the process.


- Once the execution is complete, Terraform will display a summary of the created resources. You can also check the AWS Management Console to verify the existence of the IAM groups, users, policies, and roles. For Example - I have attached the UI tour of how users will be created after applying.

And that's it! You have successfully created IAM groups, custom users, and admin users, and assigned policies and roles using Terraform. You now have a secure and organized access control system in place for your AWS infrastructure.
For reference, I have also added an example where “user7” was not able to create an ec2 instance with the “t3micro” type because he only has access to creating only “t2micro” type.

Remember to keep your Terraform state files safe and backed up, as they contain sensitive information about your infrastructure. Additionally, make sure to review and update the IAM policies and permissions regularly as your requirements evolve.
Conclusion:
In this blog post, we covered the step-by-step process of creating IAM groups, custom users, and admin users and assigning policies and roles using Terraform. By following these instructions and understanding the code, you can efficiently manage user access and permissions in your AWS environment. IAM provides granular control over resource access, ensuring security and compliance.
Remember, proper user management and access control are essential for maintaining the security and integrity of your AWS infrastructure. Regularly review and update user permissions as needed to adhere to the principle of least privilege.